Thursday, March 31, 2011

Day #56: In the Doghouse at the Farmhouse

I've created puppets for this project in my studio, at home, and in moving vehicles. Today's creation happened in at Urban Farmhouse, a great farm-to-table restaurant in Shockoe Bottom.


There was a gathering of 365ers (a bunch of people in the area doing their own unique and fabulous 365 projects) at Urban Farmhouse, and the energy being around a group of creative people is really amazing. Today's project was born of this gathering.


I had the pleasure of sitting between Noah Scalin of Skull-A-Day fame and Madonna Dersch of Happy Homemaker. During the course of the conversation I was illustrating something with my hands and had the idea to create a "hand puppet" that I'm sure has been manipulated on many a restaurant table. The ubiquitous "hand dog."

I don't know if what I was doing  is really called that, but you get the picture. Kids do this -- especially making the dog raise a back leg so it can mark its territory, right?

But I was fortunate enough to be sitting next to Madonna...and we were both inspired! You see, Madonna is making houses and structures of all types in all sorts of media, both 2-D and 3-D. She has made houses from oranges, houses that would be great for Hobbits, and she's doing a great series of houses where she has a different house for each letter of the alphabet -- even Q (I told her they would make a great children's book).

I bet you can think of some sort of structure that goes great with a dog. Ta-daah! Two blogs in one fell swoop.

I didn't imagine we could actually pull this off in the restaurant, but Madonna had a bag that reminded me of Hermione's purse in Harry Potter Book 7 -- a bag that had an invisible expansion spell put on it so she could keep all of her books (a whole library's worth!), clothes, a tent, and all sorts of things necessary for young wizards on the run.

Me: Hey, does that sketchbook have any new houses in it?

Madonna: Not really. It's still pretty new. I only have some basic sketches in it.

Me: Wow. It would be so cool if I could actually make a real dog right now and you could make a doghouse! Then we would be done with our projects for today.

Madonna: We really should!

Me: But I need some scissors...

Madonna: OK. (She pulls out a pair.)

Me: And markers...

Not only did Madonna have just a few markers -- she had several zipper bags with a wide variety of markers. Even metallic markers!! (Seriously. Even metallic markers.)

Me: Um...glue?

She had two glue sticks. I was set.

And we both set to work.

The sketchbook became both doghouse and puppet stage. (See the glue sticks to the right?)


I'm so glad we were able to collaborate on this. It was so fun to talk with other 365ers about the joys and frustrations of doing these yearlong creative commitments. I look forward to doing it again!

After we left the restaurant, I headed to the studio for a little bit more work. I needed to shellac something so it would be dry by tomorrow morning. While there, I made a little video of my "hand dog" in action.


I'm going to have to get a bag like Madonna's for puppets on the go.

Wednesday, March 30, 2011

Day #55: Mouse Guts

I love to show people puppet innards!

The mouse mechanism is pretty simple. It didn't start out that way. As per usual, when you start out designing something it always has more strings/rods than it really needs. The objective is to simplify the movements to what a puppet really "needs" to as informed by the script.

The mouse needed to scamper along, "sniff" it's nose and whiskers, and wiggle it's butt.

To do this, I based the mechanism around a really large spring.


The spring forms the "neck" of the puppet. This allows for a bit of bounce as the puppet moves. It's mostly hidden from  view.


I also embedded some wire into the fabric to have a point of attachment for the fishing line we use for the puppet controls.


Mouse in the studio! It will take a while before I can show movement footage; I like to attach handles and paint all the rods at once. (Saves time!)

I hope you've enjoyed seeing how we get from here:

 
to here:

Tuesday, March 29, 2011

Day #53: Eeeek -- a mouse!

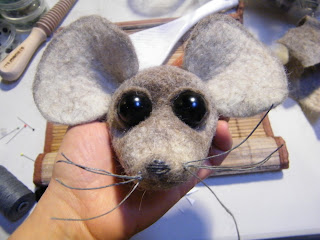
Ta-dah! Mouse! I went a little bit crazy with the whole shutterbug thing.

OK, you're thinking, "No biggie. It's a mouse."


Well, this mouse is a very special puppet for me, because it is the first totally "felted" puppet I've ever created. I've been working to "green" up my puppet building for a while. I have been building lots of soft sculpture puppets, which are created using a foam rubber base. The foam is covered with fabric, which is glued and carefully hand stitched. That's not how this was made. 


This puppet is made from pure wool -- most of it local wool from sheep raised in Virginia. There's a touch of Navajo-Churro (from Vermont) in it, too, and a dash of wool from Kentucky. I get a kick out of knowing from where each fiber comes. And I am super-psyched that I didn't use any foam rubber or any toxic adhesives in creating this puppet.
 

Felting involves taking wool fibers and turning them into a fabric. You can create 2-D forms and 3-D forms.
The mouse was wet-felted using a resist. The ears and tail were created separately and sewn on. The eyes are made using glass beads and the whiskers are waxed linen thread.


 I've used wire for some of the internal support, but the wool is very sturdy. I felted the snot out of it!


I like the fact that I can directly sculpt with the wool AND that I have more control over the color. So often, for other types of building, you are at the mercy of whatever types/colors of fabric are out there. Making them with wool gives me much more control over the color.

My daughter wants me to name him "Despereaux." Kids always want puppets to have names and get very upset when they don't have one!

I really need to add those screw eyes to the rod.

I'll post up info on the mechanism (puppet innards) tomorrow!

Day #53: Nosy, nosy, nosy

Alternate title: Being Needled

I am so angsty that my little mouse is not yet done. I forgot a cardinal rule: just because a puppet is small, does not mean it is simple. Sometimes, a smaller puppet can be much more complicated to build because you have to fit mechanisms in a much smaller space. You have to tweak things on such a minuscule scale that you feel you might never, ever finish. That's where I am right now. Puppet building purgatory.

Yesterday I was looking for my needle-nosed pliers. Now I have them. (They were in the traveling repair kit.) I had to resort to this puppet...

And it even has a moving mouth -- the bottom jaw, at that!
 Tomorrow: Racing to the MOUSE finish line!

Sunday, March 27, 2011

Day #52: Talking Trash...

I am so close to finishing the mouse. I'll post up some update pics below. I think I actually would've finished, but I really, really need some tools that I can't seem to locate. I'll have to fix that -- need some needle-nosed pliers!

But...today's post!

I really did not want to pause what I was working on today; I did not want to stop working on my mouse. Fortunately, I found inspiration in an unusual place: a trash can.

My daughters know that I can make anything "talk" and ask me to do it all the time. My younger daughter especially likes me to make trash cans talk. There just so happens to be a fabulous "talking" trash can in the building where my studio lives.

I brought it to life a bit more today!


(Trashiest puppet ever! Sorry about the sideways view...)

And here is my mouse...

Experimenting with eyes and ears...
Eyes, ears, whiskers!

Fingers crossed that I'll find my needle-nosed pliers and finish tomorrow!

Day #51: It Came from my Husband's Desk...

A few days ago, my husband shared (in a most public forum) the lovely story of how I had him call my cell phone to help me locate it only to find it in my, um, pocket.

I don't know if this counts as the revenge that I promised, but today's creation was spawned from my husband's desk.

I have to say that this wasn't that much of a challenge -- I could clearly create a dozen or so puppets from his desk. I'm sitting at it right now and can see three juggling balls, dead batteries, coins galore, a mint, a money pouch, a twist tie, a metronome, wine glasses, an empty Virgil's Orange Cream Soda (ew), sunglasses, keys, a lady bug our daughter made (it's really cute), more keys, a yardstick, a lollipop wrapper, a baseball, a dead cell phone, protective eye-wear, a nerf ball (OK, I think I put that there), nail clippers, a cuticle remover (his, not mine), and (of course) office supplies like pens, hi-liters, paperclips, speakers, and paper. That's the abridged version. Oh, there is also a casting of a deer's hoof print.

Mint man! Mint head, paperclip body with twist ties as needed.
Mint Man hanging out on top of the paperclip box.
To the left you can see the giant ladybug our older daughter made when she was around five years old!

So today I made a paperclip, mint-headed marionette-ish puppet. I say "ish" because I didn't make an actual control rod. It sort of reminds me more of a suspended limberjack. What's a limberjack? It's a puppet/rhythm instrument that looks like a dancing man on a board. Check the limberjack link for a really great example!

P.S. Just to be clear: This was fully created on Saturday, but my camera battery was dead and needed to recharge.


Friday, March 25, 2011

Day #50: Blink!

Working on a mock-up for the eyeball mechanism inside the owl puppet.

Knowing when to use a mechanism and when not to use a mechanism is a true form of wisdom. I'm always very picky about what I use -- always taking my cues from the script.

What does the puppet NEED to do?

You can make a puppet do all sorts of things; it's making good choices that can be tricky. I mean, you need to make sure that you have the right number of hands and fingers to actually operate it, right? Our owl puppet will need to fly onto the stage (wings that open/close/flap=one hand). The head needs to turn...and I'd like the eyes to blink (that's the other hand doing those two things). I still need to figure out if I have enough fingers to give him a moving beak....but that's another post.

I like to work out my mechanism issued before they are inside a real puppet. (This is especially helpful because half the battle can be figuring out how to get them inside the mechanism -- or knowing what stage of the build you need to incorporate the mechanism!)


It's a prototype, and we like to "recycle" when we make these.

Here is the part of the bottle we will be using for our owl puppet mock-up. I have a giant collection of Styrofoam balls that have been passed onto me. I really hate Styrofoam. I won't buy it new, but I will use it if it is received as a "hand me down."

Speaking of recycling stuff -- old, dead pens have a great plastic tube inside of them that is great for puppet mechanisms. They perfectly fit the wire. (If you are in Richmond and have old pens and want to pass them onto me -- please do!)

Puppet Innards


P.S. For those of you who visited yesterday, I feel I must state that, yes, I did think about the amazing Dr. Who episode called "Blink" when I titled this one!