Tuesday, February 8, 2011

Day #5: Cardstock Theatre

Perfect idea for a rainy day. Take a deck of cards that's a few cards short and make your own toy theatre. I had some playing cards lying around the studio. Literally -- I think my children left them out. Voila -- instant King and Queen! Cut out the characters you want; tape on some extra bits (a skirt, a cape, a bigger crown); attach a rod -- chopsticks are great for this. Then find some cardboard to make your own castle tower (I always wanted to live in a tower).
You can add bits and pieces to your characters using scrap materials.

Our valiant King will allow no harm to befall his Queen!

Or is it his Queen? (He might be on the lookout for the King of Clubs...)

Monday, February 7, 2011

Day #4: A Little Squirrely

I'm keeping it short and sweet today -- I am in the studio working on the finished version of the mouse prototype...I will post that up soon!  Here is another example of a prototype for the squirrel puppet that I finished today. I made this just like the mouse prototype with paper plates, rope, paper cups, a dowel rod, some string, and duct tape. I am looking forward to building the finished version -- the tail will be fabulous!

Sunday, February 6, 2011

Day #3: Mouse Prototype

I am building a new show right now, so I have a need to work out lots of new puppet designs. The new show, Little by Little, features lots of animal puppets. I want to make sure my proportions are right for all of the puppets and get all the mechanics worked out, before I invest a lot of energy in building the finished piece. There is nothing worse than a beautiful puppet that just doesn't move well.

For rod puppets, you have to pay attention to the placement of the rod, the length of the rod, and the angle of the rod while the puppet is in motion. If you are adding any special mechanisms (nodding head, head movement side-to-side, eye movement, etc...), then that adds another layer of complexity. Prototypes are my solution to working out the kinks.
  

Mouse prototype for Little by Little
in its upright position.

Today, I worked on a simple mouse proto-puppet. I have some paper plates and cups at the studio (leftover from one of my girls' birthday parties). I used one cup, part of a plate that I folded, some duct tape, and a chopstick to work out the design specs for the little mouse in our story.

Mouse in scamper position.
To know what you want a particular puppet to do requires consulting the script. (You really, really need a script before you build anything.) We actually need two mice for the show (a rod puppet mouse and a shadow puppet version of the same character). The rod puppet version needs to be able to scamper about with its body horizontal and it needs to be able to sit up and look around. The purpose of the prototype is to work out the placement of the rod on the puppet, the size of the rod insertion point, and the puppet proportions.
 
Figuring out the rod insertion point/size

I have no idea if any other puppeteers do this, but I love to build prototypes from inexpensive -- or just leftover scrap -- materials. I build all kinds of puppets (hand, shadow, rod, etc...), but my favorite type of puppets are rod puppets. Building a prototype helps to work out design kinks/mechanics, improve movement, work on proportions, and develop your character in a fearless fashion. Paper plates, duct tape, cardboard boxes, string, rope, and staples are all you need to get started.

Working in this way, I don't worry about messing up, which is very freeing. Then when I get ready to make the "real" puppet, I also know exactly what I am doing. (Or I can come pretty darn close!)

Hmmm...looking at this reminds me that
I will need a tail in the finished piece!

Saturday, February 5, 2011

Day #2: Joe-Petto

I had so much fun with the puppet project for today! There was a pan of moussaka in the oven, so the kitchen smelled fabulous. We had puppet performances today, so I needed a puppet I could make outside my studio. My inspiration for this object puppet came from stuff from the kitchen. An object puppet is exactly what it sounds like: a puppet made up from a bunch of objects. We used the camping kettle, a metal coffee cup, refrigerator magnets, and wooden salad tongs.
Implements of construction.

The main inspiration was the camping kettle. I was staring at it, and inverted it in my mind thinking about how the spout looks an awful lot like the nose...voila!
The fridge magnets were my husband's idea (he's so clever!), and we used a tablecloth for his body. The wooden salad tongs made great hands. Here is "Joe-Petto" (named after Mr. Geppetto, the puppet builder who made Pinocchio) waiting for the water to boil so he can have some coffee:
A watched pot never boils!
Finally! The coffe is ready! Joe-petto has a cup...Ahhhhhh!

Mmmmm....Good to the last drop! (Life is good...)
The moussaka was good, too.

P.S. Thank you, Sam, for helping with the puppet manipulation when two hands were not enough; thanks, Katy for being our photographer!

Friday, February 4, 2011

Day #1: Going Bananas or Worst Puppet Ever!

It's my birthday, and I am celebrating with an edible puppet that, in many ways, truly encapsulates this 365 Project. I must be bananas to do this project. After all, I am busy, over-committed, I homeschool my girls (with help from my amazing husband), and run my own company. So I know that I really need to do this. Need to reconnect with my own creativity and my favorite medium: puppetry. So, yes, I am totally bananas!

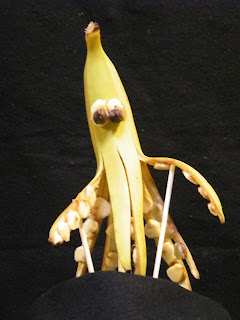
Banana Octopus Puppet
This puppet is part of my "Play With Your Food" category of puppets. I took a banana, peeled it carefully, and used slices of it to make the suckers. I should give credit where credit is due; it was my older daughter who came up with the idea to use the slices as suckers. I stuck them on with peanut butter "glue" and then used banana slices with chocolate chips for the eyeballs...Mmmmmm....Bananas, chocolate, and peanut butter! After all, it is my birthday -- so I have a great treat to enjoy in a few minutes. And though I am sharing this post, I will not be sharing the treat!

My alternate title for this is "Worst Puppet Ever," which requires some explaining.

A few weeks ago, I attended a workshop with the Richmond Comedy Coalition. It was great and lots of fun! It's been a while since I've done improv, but I find it's a great way to get the creative juices flowing and be creative with a group.

At the RCC workshop, one of the warm-up games we did was called "Worst Improv EVER!" Creative work is very personal. Oftentimes, when you do something creative or performance related, there's a tendency to be concerned about doing a bad job.  That your scene (or show or jewelry or book or whatever) will be awful, that everyone will hate it, that you will be mortified with embarrassment.

The point of the game is to get that fear out of your system. It's important to remember that before you can become good at something, you need a period of allowing yourself to make mistakes and mess up. For the game, everyone lines up, does a short scene of a random nature, and then the other workshop participants shout out in unison: WORST IMPROV EVER!

So, I will say, "Worst Puppet Ever." This gets it out of my system.

Detail: Peanut butter as glue!

Thursday, February 3, 2011

The show must go on!

I performed in a Slam a few years ago -- my first one! I was sooo nervous. I am used to performing for children, and Slams are for grown-ups (you know who you are). Everything went fine, though, miraculously. Really, it was a miracle, because the performance was supposed to be a two-person piece. The day before we went on, however, my other performer had a family emergency and had to go to Atlanta. It was a real emergency, too, so I couldn't even be upset. I just had to reconfigure the piece for just lil' ol' me....
From Plight of the Bumblebee, a Slam piece by Barefoot Puppets.

I think this 365 project will be a lot like that. Things come up in our lives all the time, but the show must go on! Stay tuned...the adventure starts tomorrow! Wish me a happy birthday while you're at it!

Tuesday, February 1, 2011

Da Rulz

OK. One does not really need to have "rules" to do a 365 Project, it's true. But I'd like to write out a few guidelines, just for kicks. Just to have a record of where my mind has been in terms of this project.

1. Every day I post up a puppet of some sort.
2. I get to determine what constitutes a puppet.
3. If I am making puppets with other people, I might choose to post up their puppets (especially puppets I make with children -- I think it's important to show what children actually make).
4. If I go out of town, I will set up some reports to automatically post to the blog. I will still work on puppets on the days I am out of town (though it might just be sketching or working on ideas).
5. Really cool sketches with nifty mechanisms can be posted as part of the project.
6. I can change the rules at any time.

Alright...counting down the days! We launch on Friday!