Pages

Thursday, March 31, 2011

Day #56: In the Doghouse at the Farmhouse

I've created puppets for this project in my studio, at home, and in moving vehicles. Today's creation happened in at Urban Farmhouse, a great farm-to-table restaurant in Shockoe Bottom.


There was a gathering of 365ers (a bunch of people in the area doing their own unique and fabulous 365 projects) at Urban Farmhouse, and the energy being around a group of creative people is really amazing. Today's project was born of this gathering.


I had the pleasure of sitting between Noah Scalin of Skull-A-Day fame and Madonna Dersch of Happy Homemaker. During the course of the conversation I was illustrating something with my hands and had the idea to create a "hand puppet" that I'm sure has been manipulated on many a restaurant table. The ubiquitous "hand dog."

I don't know if what I was doing  is really called that, but you get the picture. Kids do this -- especially making the dog raise a back leg so it can mark its territory, right?

But I was fortunate enough to be sitting next to Madonna...and we were both inspired! You see, Madonna is making houses and structures of all types in all sorts of media, both 2-D and 3-D. She has made houses from oranges, houses that would be great for Hobbits, and she's doing a great series of houses where she has a different house for each letter of the alphabet -- even Q (I told her they would make a great children's book).

I bet you can think of some sort of structure that goes great with a dog. Ta-daah! Two blogs in one fell swoop.

I didn't imagine we could actually pull this off in the restaurant, but Madonna had a bag that reminded me of Hermione's purse in Harry Potter Book 7 -- a bag that had an invisible expansion spell put on it so she could keep all of her books (a whole library's worth!), clothes, a tent, and all sorts of things necessary for young wizards on the run.

Me: Hey, does that sketchbook have any new houses in it?

Madonna: Not really. It's still pretty new. I only have some basic sketches in it.

Me: Wow. It would be so cool if I could actually make a real dog right now and you could make a doghouse! Then we would be done with our projects for today.

Madonna: We really should!

Me: But I need some scissors...

Madonna: OK. (She pulls out a pair.)

Me: And markers...

Not only did Madonna have just a few markers -- she had several zipper bags with a wide variety of markers. Even metallic markers!! (Seriously. Even metallic markers.)

Me: Um...glue?

She had two glue sticks. I was set.

And we both set to work.

The sketchbook became both doghouse and puppet stage. (See the glue sticks to the right?)


I'm so glad we were able to collaborate on this. It was so fun to talk with other 365ers about the joys and frustrations of doing these yearlong creative commitments. I look forward to doing it again!

After we left the restaurant, I headed to the studio for a little bit more work. I needed to shellac something so it would be dry by tomorrow morning. While there, I made a little video of my "hand dog" in action.


I'm going to have to get a bag like Madonna's for puppets on the go.

Wednesday, March 30, 2011

Day #55: Mouse Guts

I love to show people puppet innards!

The mouse mechanism is pretty simple. It didn't start out that way. As per usual, when you start out designing something it always has more strings/rods than it really needs. The objective is to simplify the movements to what a puppet really "needs" to as informed by the script.

The mouse needed to scamper along, "sniff" it's nose and whiskers, and wiggle it's butt.

To do this, I based the mechanism around a really large spring.


The spring forms the "neck" of the puppet. This allows for a bit of bounce as the puppet moves. It's mostly hidden from  view.


I also embedded some wire into the fabric to have a point of attachment for the fishing line we use for the puppet controls.


Mouse in the studio! It will take a while before I can show movement footage; I like to attach handles and paint all the rods at once. (Saves time!)

I hope you've enjoyed seeing how we get from here:

 
to here:

Tuesday, March 29, 2011

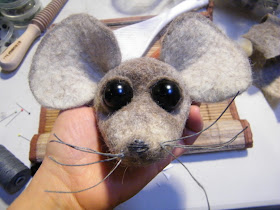
Day #53: Eeeek -- a mouse!

Ta-dah! Mouse! I went a little bit crazy with the whole shutterbug thing.

OK, you're thinking, "No biggie. It's a mouse."


Well, this mouse is a very special puppet for me, because it is the first totally "felted" puppet I've ever created. I've been working to "green" up my puppet building for a while. I have been building lots of soft sculpture puppets, which are created using a foam rubber base. The foam is covered with fabric, which is glued and carefully hand stitched. That's not how this was made. 


This puppet is made from pure wool -- most of it local wool from sheep raised in Virginia. There's a touch of Navajo-Churro (from Vermont) in it, too, and a dash of wool from Kentucky. I get a kick out of knowing from where each fiber comes. And I am super-psyched that I didn't use any foam rubber or any toxic adhesives in creating this puppet.
 

Felting involves taking wool fibers and turning them into a fabric. You can create 2-D forms and 3-D forms.
The mouse was wet-felted using a resist. The ears and tail were created separately and sewn on. The eyes are made using glass beads and the whiskers are waxed linen thread.


 I've used wire for some of the internal support, but the wool is very sturdy. I felted the snot out of it!


I like the fact that I can directly sculpt with the wool AND that I have more control over the color. So often, for other types of building, you are at the mercy of whatever types/colors of fabric are out there. Making them with wool gives me much more control over the color.

My daughter wants me to name him "Despereaux." Kids always want puppets to have names and get very upset when they don't have one!

I really need to add those screw eyes to the rod.

I'll post up info on the mechanism (puppet innards) tomorrow!

Day #53: Nosy, nosy, nosy

Alternate title: Being Needled

I am so angsty that my little mouse is not yet done. I forgot a cardinal rule: just because a puppet is small, does not mean it is simple. Sometimes, a smaller puppet can be much more complicated to build because you have to fit mechanisms in a much smaller space. You have to tweak things on such a minuscule scale that you feel you might never, ever finish. That's where I am right now. Puppet building purgatory.

Yesterday I was looking for my needle-nosed pliers. Now I have them. (They were in the traveling repair kit.) I had to resort to this puppet...

And it even has a moving mouth -- the bottom jaw, at that!
 Tomorrow: Racing to the MOUSE finish line!

Sunday, March 27, 2011

Day #52: Talking Trash...

I am so close to finishing the mouse. I'll post up some update pics below. I think I actually would've finished, but I really, really need some tools that I can't seem to locate. I'll have to fix that -- need some needle-nosed pliers!

But...today's post!

I really did not want to pause what I was working on today; I did not want to stop working on my mouse. Fortunately, I found inspiration in an unusual place: a trash can.

My daughters know that I can make anything "talk" and ask me to do it all the time. My younger daughter especially likes me to make trash cans talk. There just so happens to be a fabulous "talking" trash can in the building where my studio lives.

I brought it to life a bit more today!


(Trashiest puppet ever! Sorry about the sideways view...)

And here is my mouse...

Experimenting with eyes and ears...
Eyes, ears, whiskers!

Fingers crossed that I'll find my needle-nosed pliers and finish tomorrow!

Day #51: It Came from my Husband's Desk...

A few days ago, my husband shared (in a most public forum) the lovely story of how I had him call my cell phone to help me locate it only to find it in my, um, pocket.

I don't know if this counts as the revenge that I promised, but today's creation was spawned from my husband's desk.

I have to say that this wasn't that much of a challenge -- I could clearly create a dozen or so puppets from his desk. I'm sitting at it right now and can see three juggling balls, dead batteries, coins galore, a mint, a money pouch, a twist tie, a metronome, wine glasses, an empty Virgil's Orange Cream Soda (ew), sunglasses, keys, a lady bug our daughter made (it's really cute), more keys, a yardstick, a lollipop wrapper, a baseball, a dead cell phone, protective eye-wear, a nerf ball (OK, I think I put that there), nail clippers, a cuticle remover (his, not mine), and (of course) office supplies like pens, hi-liters, paperclips, speakers, and paper. That's the abridged version. Oh, there is also a casting of a deer's hoof print.

Mint man! Mint head, paperclip body with twist ties as needed.
Mint Man hanging out on top of the paperclip box.
To the left you can see the giant ladybug our older daughter made when she was around five years old!

So today I made a paperclip, mint-headed marionette-ish puppet. I say "ish" because I didn't make an actual control rod. It sort of reminds me more of a suspended limberjack. What's a limberjack? It's a puppet/rhythm instrument that looks like a dancing man on a board. Check the limberjack link for a really great example!

P.S. Just to be clear: This was fully created on Saturday, but my camera battery was dead and needed to recharge.


Friday, March 25, 2011

Day #50: Blink!

Working on a mock-up for the eyeball mechanism inside the owl puppet.

Knowing when to use a mechanism and when not to use a mechanism is a true form of wisdom. I'm always very picky about what I use -- always taking my cues from the script.

What does the puppet NEED to do?

You can make a puppet do all sorts of things; it's making good choices that can be tricky. I mean, you need to make sure that you have the right number of hands and fingers to actually operate it, right? Our owl puppet will need to fly onto the stage (wings that open/close/flap=one hand). The head needs to turn...and I'd like the eyes to blink (that's the other hand doing those two things). I still need to figure out if I have enough fingers to give him a moving beak....but that's another post.

I like to work out my mechanism issued before they are inside a real puppet. (This is especially helpful because half the battle can be figuring out how to get them inside the mechanism -- or knowing what stage of the build you need to incorporate the mechanism!)


It's a prototype, and we like to "recycle" when we make these.

Here is the part of the bottle we will be using for our owl puppet mock-up. I have a giant collection of Styrofoam balls that have been passed onto me. I really hate Styrofoam. I won't buy it new, but I will use it if it is received as a "hand me down."

Speaking of recycling stuff -- old, dead pens have a great plastic tube inside of them that is great for puppet mechanisms. They perfectly fit the wire. (If you are in Richmond and have old pens and want to pass them onto me -- please do!)

Puppet Innards


P.S. For those of you who visited yesterday, I feel I must state that, yes, I did think about the amazing Dr. Who episode called "Blink" when I titled this one!

Thursday, March 24, 2011

Day #49: Ode to the Doctor!

I should preface today's post this with a confession: I really enjoy BBC shows, and Dr. Who is one of my faves. I just found out --

"WHAT? Have you been living in a hole??"

Err...yes. Well, no. Just my studio.

Going back. I just found out that there is finally a scheduled time for the new Dr. Who. It is one month from now on April 23rd. In honor of the Doctor, I have created the campiest puppet EVER.

Enjoy! And thank you, Melanie, for stopping by the studio and doing the video!

The TARDIS.

Credits:
TARDIS Puppet by Heidi Rugg
Lighting by Heidi Rugg
Light Direction by Melanie Johnson
Videorecording by Melanie Johnson
Sound by Heidi Rugg
Backdrop by Heidi Rugg and Melanie Johnson

Wednesday, March 23, 2011

Day #48: Fuzzy Wuzzy Caterpillar

Spring is in the air! Thought a giant, fuzzy caterpillar would be appropriate.


As I've said before, I don't always like the word "cute" for puppets. This puppet is just that. No getting around it! Made with two strands of feather boa, two thin pieces of bamboo, a touch of wire (for attaching the boa to the rods), and two big eyes I had in my "stash" of eyeballs.


 The only problem with working in the studio and then taking the pictures is that I can't do video clips while manipulating puppets at the same time. This puppet actually coils nicely around your neck (in a cuddly, non-python sort of way).


Yep. Cute.

Tuesday, March 22, 2011

Day #47: Creepy, crawly...

I love spiders. I realize that this is really weird.

I was a docent at the Natural History Museum for a while and gave tours to the spider exhibit to Kindergartners. It was a temporary exhibit and totally creepy. The colors were what really did it. Black. Gray. Red. Yikes!

But I learned a LOT about spiders and the many kinds of spiders. There is even an artist with a 365 Spider Project that I enjoy -- she makes a spider every day out of a variety of materials. They are lovely creations: delicate, detailed, intricate, beautiful. Spiders can be all of these things.

But to so many people they are creepy.

We have a rule in our house to NOT kill spiders. This is difficult to explain to my children's friends when they come over. I often have to rescue spiders. I remember when a friend of my older daughter came over to play. She was not too keen on the cute funnel spider that had made its home in the radiator of our bathroom. Oh well. I had to take it outside or risk an accident. She was ever after suspicious of our bathroom!

So today we have a spider: the simple glove spider. Two gloves, two hands and go!

Attack!


Monday, March 21, 2011

Day #46: Based on a true story

I was in the studio working away and wondering what to do for the blog today. I'm itching to post up one of the new puppets, but they still need some tweaks (and they need to be dry!).

What to do?

That's when the phone rang. It was my ten year old daughter, calling past her bedtime.

"Hi, mom."

"Hi, Sweetie. What's going on?"

"Um...I lost my tooth and Daddy is asleep already."

"OK...you lost a tooth?"

"Uh-huh."

It dawned on me a moment later. "You are worried that if you don't tell me that maybe the tooth fairy won't figure out that you lost a tooth tonight, huh?"

"Um....well...uh-huh."

So tonight I will get home and need to make a special delivery to underneath my daughter's pillow.

Before we hung up, my daughter asked me what my puppet was for the day. I told her that I hadn't figured it out.

"Maybe it could be about my tooth?" she suggested. "Maybe you could even make a tooth fairy puppet!"

Of course, I can totally make a tooth fairy puppet. Thanks for the inspiration! So here we have it -- our sparkly tooth fairy.


Wings!
(For those of you who have been visiting a while, you might recognize the head...yes, it's the same head from Gramma of the Little Red Riding Hood finger puppet series! If you remember, I had to attach the head with Velcro so I could "disguise" the wolf!)

Good night! I am heading home to figure out what the going rate is for a molar...

Sunday, March 20, 2011

Day #45: Wild about rod puppets

I've had fun putting together all the Little Red Riding Hood stuff, because I enjoy stories and their various structures. But, structurally speaking, I love rod puppets most of all.

I spent a good chunk of time in the studio today and I knew that I wanted to build a non-glue-stick puppet today. Rod puppets are my forte, but they are usually time-consuming and detailed and...wait a minute! Surely I could think of something that I could put together somewhat quickly, right? I mean, that's what all the stuff that I have in my studio is for, isn't it?

I will say that my studio is pretty well-organized. Supplies are categorized and accessible. I have a great studio.

I took stock. Dowel rods -- of course,  I have lots! And tubes...and paper cups...and lots of fabric...and cardboard.

Great texture on this sponge-painted fabric made by some former students.

Sometimes I get my inspiration from fabric. I love fibers and textiles of all sorts! I have several pieces of hand-painted, sponge-textured fabric that were made by students I had done a residency with about a year and a half ago. Great kids -- and they loved anything that had to do with painting! We made these really large giraffe and zebra body-puppets. I still had some of the fabric. Ah-hah!

Well, OK, but does it really move?


The method behind the movement of this rod puppet is pretty straightforward. There is a dowel rod attached to the head. Surrounding the rod is a tube that is connected directly to the body of the puppet. This means that the head and the body can be moved independently. It's very simple and we've used this for a number of puppets -- mostly in our Little Bread Hen show for all the chickens and the sheep dog.

Enjoy the video -- especially the backside wiggle at the end!

Saturday, March 19, 2011

Day #44: Happily Ever After? (Contains puppet violence)

Let's be honest, "Little Red Riding Hood" is a pretty gruesome tale. Wolves, strangers, dark forests, big teeth, devoured grandmothers, and an axe. Not your typical Disney special.

In 1976, Bruno Bettelheim wrote a book called The Uses of Enchantment: The Meaning and Importance of Fairy Tales. It's been a while since I read the book, so I will just quote from Wikipedia (please excuse my laziness...it's late!).

In the book, Bettelheim discusses the emotional and symbolic importance of fairy tales for children, including traditional tales at one time considered too dark, such as those collected and published by the Brothers Grimm. Bettelheim suggested that traditional fairy tales, with the darkness of abandonment, death, witches, and injuries, allowed children to grapple with their fears in remote, symbolic terms. If they could read and interpret these fairy tales in their own way, he believed, they would get a greater sense of meaning and purpose. Bettelheim thought that by engaging with these socially-evolved stories, children would go through emotional growth that would better prepare them for their own futures.

Point is, Bettelheim makes a case for the necessity of sharing dark stories such as "Red Riding Hood" with young children. How else will children develop and be able to confront the darkness within our world if they do not have the basic archetypes within their consciousness to grapple with it or to even acknowledge its existence?


For today, I think you know what's in store...We've seen Little Red, The Wolf, and Gramma so far. That leaves us with just the Woodsman.

I feel I must state that no real wolves (only a symbolic, archetypal wolf who really deserved it) were injured in the creation of today's post. The next few images are as graphic as it gets in the world of finger puppets. (You have been warned!)


And they all lived happily ever after...except, I suppose, the wolf.


THE END.

Friday, March 18, 2011

Day #43: ...What Big Teeth You Have!

Today's post is a tribute to Georges de Mestra. Who is this? Well, this is the Swiss gentleman who invented Velcro back in 1941. This man did not know it, but he revolutionized puppetry! Seriously, what puppeteer could imagine having to hang curtains with hook and eye and other contraptions.

Friend to all puppeteers!
A puppeteer friend of mine even suggested that my husband and I name our firstborn child "Velcretia." We, um, didn't go that far.

But for today's project we are continuing with out "Little Red Riding Hood" theme. These are all finger puppets made from studio scraps placed over the plastic tubes from leftover glue sticks. We've done Little Red, The Big Bad Wolf, and Gramma. Today we have:

What big teeth you have!

"Gramma."

The fun thing for me was that this puppet involved a little bit of Velcro and not much time. I took the wolf finger puppet and decapitated it. (Yikes!)


When I made Gramma, I attached her head with Velcro. So all I had to do for today was switch heads and -- voila! -- new puppet! Now I can even do scary things like this:

Very scary...
Which leaves us with just one more character in this story...

Thursday, March 17, 2011

Day #42: Gramma...

Yes, I'm continuing with my glue-stick-tube series from "Little Red Riding Hood."

C'mon...you totally knew this one was coming!

Yep. Gramma!


The cast so far...

And tomorrow...???

Wednesday, March 16, 2011

Day #41: The Big Bad Wolf!

How could we have "Little Red Riding Hood" without...

The Big Bad Wolf!

They should look scarier, don't you think? (A bit more Grimm!)

Tuesday, March 15, 2011

Day #40: Recycled Riding Hood Finger Puppet (and Rat Update!)

It's tough blogging about puppets and fun stuff when the world is falling apart and people are in real danger. I have been racking my brain trying to think of something to do that's related to what is going on, but my brain just locks up and I am unable to move beyond the horror of reality.

I guess I'll just stick with the basics.

I had a productive day at the studio working on my rat/possum experimental puppet. It's coming along quite nicely.

Eyes, eyelids in place -- working on the mouth.
For my puppet posting du jour, I was inspired by a glue stick.


I use these in workshops, but I always feel horrible about the plastic waste involved. I picked one up today and noticed how very, very perfectly the external tube fits nicely over your finger... I looked around the studio a bit more and located a ping-pong ball.

I'm sure you see where this is going!

I have lots of scrap fabric that needs a purpose, so I gathered up some of that, too. Voila! Little Red Riding Hood.

Perfect Fit!


If you stick the finger puppet back on the glue part, it even stands up. I was able to use leftover materials for this (most puppeteers have ping-pong balls, scrap fabric, glue sticks, and other weird stuff on hand at all times!).